Royal Hidden Passage

screen4 royal hidden passage zeldatotk wiki guide 300px

A hidden passage that takes you below Hyrule Casle

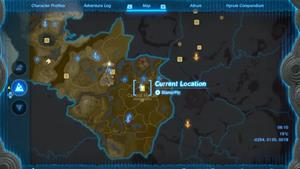
Royal Hidden Passage is a Location in Zelda Tears of the Kingdom, found in Central Hyrule. Facing the Hyrule Castle Town Ruins, face south and take the stairs down, to enter the small gap through the wall and access the Royal Hidden Passage. Here, players can find the Horned Statue, which allows them to respec their Hearts and Stamina, as well as the Soldier's Set.


Zelda TotK Royal Hidden Passage Location Map

You can find the hidden passage south from Hyrule Castle Town Ruins, by taking a set of stairs down. See it here on the TotK Interactive Map.

Hidden Passage Entrances and Exits:


Zelda TotK All NPCs and Merchants in Royal Hidden Passage

  • None


Zelda TotK Quests in Royal Hidden Passage


Zelda TotK All Items in Royal Hidden Passage


Zelda TotK Royal Hidden Passage Wildlife, Enemies, and Bosses


Zelda TotK Royal Hidden Passage Location Walkthrough

The Royal Hidden Passage can be found south of the Hyrule Castle Town Ruins. Take the stairs down, to access the Emergency Shelter. If the ladder is not available, talk to Scorpis, to get the hole open, granting you access. Once there, you will find Jerrin, the quest giver for the Side Quest Who Goes There? If you have already completed one main dungeon, just past her, you will see a gap in the wall that you can enter. This small entrance will lead you to the Royal Hidden Passage.

screen1 royal hidden passage zeldatotk wiki guide 300px

Move forward and eventually, you will be blocked by rocks. Destroy them using a bludgeoning weapon, like a Rock Hammer, to open a path.  If you don't have any similar weapons or your last one breaks, there will be lots of rocks lying around as you traverse the passages that you can use to Fuse one. A Bomb Flower can also be used to destroy the rocks blocking your path, just be careful not to get damaged by your own explosion. If you already have the Vow of Yunobo, Sage of Fire at this point, you can also use Yunobo's ability to destroy the debris.

screen2 royal hidden passage zeldatotk wiki guide 300px

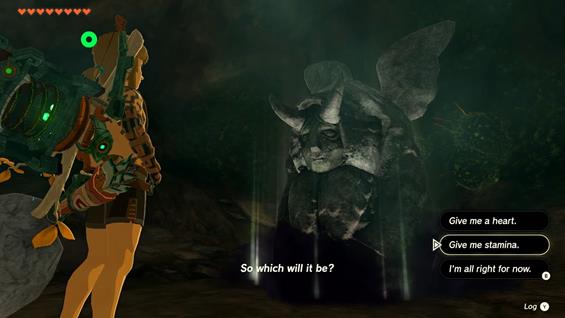
Head to your right to find the Horned Statue behind the rocks, so create a path to interact with it. This allows you two things: the first is to progress the Side Quest Who Goes There?, and the second is to be able to use the Horned Statue able to swap Link's two main stats (Hearts and Stamina) for a small fee. As was the case in Breath of the Wild, the Horned Statue can help you respec your build allowing an additional form of customization with how you'd want to play through the game.


Respeccing in Zelda: TotK

To Respec your stats, you will have to give Horned Statue one of Link's essences - either a Heart Container or Stamina Vessel, in exchange for 100 Rupees. The "I want one back" option on the other hand allows you to exchange 120 Rupees for an essence, allowing you to, for example, pick a Heart Container even if you've only given it a Stamina Vessel previously. This essentially means you're paying 20 Rupees to be able to switch your stats around.

Why Respecing? Is Respecing necessary in Zelda: Totk?

As you should probably already know, more Heart Containers mean more longevity in fights. Endgame Enemies and Bosses can deplete a huge number of hearts with a single attack, even after taking into consideration good Equipment. However, Stamina is equally important, as every action Link does requires stamina. Having low Stamina for an all-in Hearts build isn't ideal, and obviously being incredibly frail, but having an enormous amount of Stamina, could be a frustrating way to play the game. The idea is to find the right balance between these two main stats and to customize Link based on what better suits your own playstyle, and Respeccing with the Horned Statue allows the player to do just that.

Beginners should focus on hearts first, (about six or eight hearts), before spending upgrades on Stamina. Doing so will help them learn the mechanics of the game as well as its Combat


screen3 royal hidden passage zeldatotk wiki guide 565px


After interacting with the Horned Statue, take the other path to the left. You will have to break a lot of rocks in order to progress. Along the way will be some Flint, Opal, Rock Salt, and Hylian Shrooms that you can pick up. Eventually, you'll find a room where a Like Like resides. When it opens its gaping jaws, hit its weak point to stun it and deal massive damage. After defeating it, it will drop a chest with some Rock Salt. The rocks to the south lead to a small room with four Sticky Lizards.

screen5 royal hidden passage zeldatotk wiki guide 300px

Climb up to a ledge to the north to find another blocked passage. Once again, break the rocks and keep moving to will find two Bomb Flowers. Keep advancing and you will reach a bigger room, where there are two Stone Pebblits. There is a huge amount of rocks to your left, so destroy them to reveal a hidden passage.

screen6 royal hidden passage zeldatotk wiki guide 300pxscreen7 royal hidden passage zeldatotk wiki guide 300px

Enter the hidden passage and head toward what looks like a prison-like structure. Face another Stone Pebblit, and find a Soldier's Claymore inside a chest behind the rocks located in one of the small rooms.

screen8 royal hidden passage zeldatotk wiki guide 300pxscreen9 royal hidden passage zeldatotk wiki guide 300px

To the left side is another Like Like. Defeat it, to get a chest containing a Soldier's Shield. Just a bit past where it was is a chest that contains a pair of Soldier's Greaves. There are boxes on the opposite side that you can destroy, hiding five Arrows. Turn around and head back to the area where you fought the first two Stone Pebblits, and take the other exit this time, which should be on your left.

You will reach a bridge where there are two Stalkoblins waiting for you, along with a Stalmoblin. They'll keep getting back up unless you destroy their head while they're down. If you fall from the bridge and swim through the water, you will find a few Brightcaps and a Hearty Truffle. By swimming through to the other side, you will find an entrance where you will find four Glowing Cave Fishes and two Fairies.

Return to the bridge and continue forward. After facing two Keeses and an Electric Keese, you will continue downwards to eventually find another water bank. There are some breakable rocks nearby before the water, hiding some Luminous Stones you can get if you break the glowing ore. Go to the water bank now. Swim and turn left as soon as you find land, to replenish your Stamina.

You will have entered a big area with quite a lot of breakable rocks in the middle, so proceed to destroy them with whatever means are at your disposal.

 screen10 royal hidden passage zeldatotk wiki guide 300px

Doing so will reveal a Stalnox, as well as a Purple Rupee.

screen11 royal hidden passage zeldatotk wiki guide 300px

After defeating it, you can swim to two different paths. One is closed by rocks, however, so head to one you can access. Head there, destroying rocks as you progress. Climb up until you reach a bridge-like structure. From there, continue forward while still breaking rocks. Eventually, you will encounter a Shock Like. Use the trenches to your advantage during the fight. Defeating it will reward you with a chest containing a Knight's Bow.

Past it, you will reach a chasm. Look down below to find a Bubbulfrog. Hit it with an arrow to loot a Bubbul Gem

screen12 royal hidden passage zeldatotk wiki guide 300pxscreen13 royal hidden passage zeldatotk wiki guide 300px

Return to the bridge-like area, but jump down this time. Destroy the blocked door to find three Black Horriblins waiting for you on the other side.
screen14 royal hidden passage zeldatotk wiki guide 300pxscreen15 royal hidden passage zeldatotk wiki guide 300pxscreen16 royal hidden passage zeldatotk wiki guide 300px

In this area, one of the wooden platforms above has a chest containing a Knight's-Halberd Halberd. Climb back on the bridge-like structure and continue heading north. Eventually, you'll come across another set of a number of rocks. Clear them out to reveal a hidden tunnel. On the other side will be two Stalkoblins to defeat. In the northeast room, there is a large boulder you can move with Ultrahand to reveal a hole leading to a tunnel. Jump in and follow the tunnel to resurface on the gated room with another Stalkoblin, and a chest containing the Soldier's Armor. On the other side, near the hole you came out of, are breakable boxes hiding nine Arrows. Jump back into the hole to go back to the previous room.

Head all the way back to the large area with water and look to the northeast to find a tunnel in the water, blocked by some more rocks. Break the rocks and head through the tunnel to find an Ice Like on the other side. Deal with it as you have with the others, and it'll reward you with a chest containing a Traveler's Shield. There are some breakable boxes nearby hiding three more Arrows. Finally, on the other side is a chest containing the last piece of the Soldier's Set, the Soldier's Helm.


Zelda TotK Royal Hidden Passage Gallery and Notes

[other images go here]


Zelda: Tears of the Kingdom All Locations
Abandoned Eldin Mine  ♦  Abandoned Gerudo Mine  ♦  Abandoned Hebra Mine  ♦  Abandoned Kara Kara Mine  ♦  Abandoned Lanayru Mine  ♦  Afromsia Coast  ♦  Akkala  ♦  Akkala Ancient Tech Lab  ♦  Akkala Citadel Ruins  ♦  Akkala Citadel Ruins Cave  ♦  Akkala Citadel Ruins Summit Cave  ♦  Akkala Citadel Summit Cave  ♦  Akkala Depths  ♦  Akkala Falls  ♦  Akkala Highlands  ♦  Akkala Parade Ground Ruins  ♦  Akkala Sky  ♦  Akkala Span  ♦  Akkala Wilds  ♦  Aldor Foothills  ♦  Ancient Altar Ruins  ♦  Ancient Columns  ♦  Ancient Columns Cave  ♦  Ancient Observation Deck  ♦  Ancient Prison Ruins  ♦  Ancient Tree Stump  ♦  Ancient Tree Stump Cave  ♦  Ancient Underground Fortress  ♦  Anedamimik Shrine  ♦  Angel Peak  ♦  Ankel Island  ♦  Apogek Shrine  ♦  Applean Forest  ♦  Aquame Lake  ♦  Armor Shop (Goron City)  ♦  Armor Shop (Hateno Village)  ♦  Armor Shop (Kakariko Village)  ♦  Armor Shop (Kara Kara Bazaar)  ♦  Armor Shop (Lookout Landing)  ♦  Armor Shop (Rito Village)  ♦  Atun Valley Cave  ♦  Baltrea Lake  ♦  Bamitok Shrine  ♦  Bank of Wishes  ♦  Bannan Island  ♦  Bargainer Statue  ♦  Barula Plain  ♦  Big Twin Bridge  ♦  Birda Lookout  ♦  Biron Snowshelf  ♦  Birth of the Demon King  ♦  Bloodleaf Lake  ♦  Bone Pond  ♦  Bone Pond East Cave  ♦  Bonooru's Stand  ♦  Bottomless Cave  ♦  Bottomless Swamp  ♦  Bravery Island  ♦  Brazen Beak  ♦  Breach of Demise  ♦  Break-a-Part Shop  ♦  Breman Peak  ♦  Bridge of Hylia  ♦  Brightcap Cave  ♦  Broca Island  ♦  Brynna Plain  ♦  Byroad to Lanayru Wetlands  ♦  Calora Lake  ♦  Calora Lake Cave  ♦  Camphor Pond  ♦  Canteen (Gerudo Town)  ♦  Cape Cales  ♦  Cape Cales Cliffbase Cave  ♦  Cape Cresia  ♦  Carok Bridge  ♦  Cave Under Zora's Domain  ♦  Central Gerudo Cave  ♦  Central Hyrule  ♦  Central Hyrule Depths  ♦  Central Hyrule Sky  ♦  Central Hyrule Sky Archipelago  ♦  Central Square  ♦  Cephla Lake  ♦  Cephla Lake Cave  ♦  Champion's Gate  ♦  Chichim Shrine  ♦  Clarnet Coast  ♦  Cliffs of Quince  ♦  Cliffs of Ruvara  ♦  Coliseum Ruins Cave  ♦  Construct Factory  ♦  Construction Site Cave  ♦  Cora Lake  ♦  Cora Lakefront Cave  ♦  Corta Lake  ♦  Corta Lake Cave  ♦  Corvash Peak  ♦  Courage Island  ♦  Courage Steppe  ♦  Crenel Canyon Mine  ♦  Crenel Hills  ♦  Crenel Hills Cave  ♦  Crenel Peak  ♦  Crenel Peak Cave  ♦  Cucco Hideaway  ♦  Cuho Canyon Mine  ♦  Cuho Mountain  ♦  Dalite Forest  ♦  Dalite Grove  ♦  Damel Forest  ♦  Darb Pond  ♦  Darunia Lake  ♦  Darybon Plains  ♦  Daval Canyon Mine  ♦  Daval Peak  ♦  Davdi Island  ♦  Death Caldera  ♦  Death Mountain  ♦  Death Mountain Chasm  ♦  Death Mountain East Tunnel  ♦  Death Mountain Foothill Cave  ♦  Death Mountain West Tunnel  ♦  Deep Akkala  ♦  Deepback Bay  ♦  Deepback Bay Cave  ♦  Deku Tree Chasm  ♦  Deplian Badlands  ♦  Deplian Badlands Cave  ♦  Desert Coliseum  ♦  Desert Rift  ♦  Deya Lake  ♦  Digdogg Suspension Bridge  ♦  Domizuin Shrine  ♦  Dracozu Altar  ♦  Dracozu Lake  ♦  Dracozu River  ♦  Dragon's Exile  ♦  Dragonhead Island  ♦  Drenan Highlands  ♦  Drenan Highlands Chasm  ♦  Dronoc's Pass  ♦  Dueling Peaks  ♦  Dueling Peaks North Cave  ♦  Dueling Peaks South Cave  ♦  Dueling Peaks Stable  ♦  Dye Shop (Hateno Village)  ♦  East Akkala Beach  ♦  East Akkala Plains  ♦  East Akkala Plains Chasm  ♦  East Akkala Stable  ♦  East Barrens  ♦  East Biron Snowshelf Cave  ♦  East Castle Town  ♦  East Deplian Badlands  ♦  East Gerudo Chasm  ♦  East Gerudo Ruins  ♦  East Gerudo Ruins Cave  ♦  East Gerudo Sky Archipelago  ♦  East Hebra Sky Archipelago  ♦  East Hill Chasm  ♦  East Necluda  ♦  East Post Ruins  ♦  East Reservoir Lake  ♦  East Restaurant Cave  ♦  Eastern Abbey  ♦  Ebara Forest  ♦  Ebon Mountain  ♦  Ekochiu Shrine  ♦  Eldin  ♦  Eldin's Flank  ♦  Eldin Canyon  ♦  Eldin Canyon Skyview Tower  ♦  Eldin Depths  ♦  Eldin Mountains  ♦  Eldin Sky  ♦  Eldin Sky Archipelago  ♦  Elma Knolls  ♦  En-oma Shrine  ♦  Eshos Shrine  ♦  Eutoum Shrine  ♦  Eventide Island  ♦  Eventide Island Cave  ♦  Eventide Island Chasm  ♦  Eventide Island Depths  ♦  Exchange Ruins  ♦  Faron  ♦  Faron Depths  ♦  Faron Grasslands  ♦  Faron Sky  ♦  Faron Sky Archipelago  ♦  Faron Woods  ♦  Farosh Hills  ♦  Finra Woods Excavation Site  ♦  Fir River  ♦  Fire Temple  ♦  Firly Pleateau  ♦  Firly Pond  ♦  Floating Coliseum  ♦  Floating Scales Island  ♦  Floret Sandbar  ♦  Floria Bridge  ♦  Floria Falls  ♦  Floria River  ♦  Floria River Upstream Excavation  ♦  Foothill Monster Den  ♦  Foothill Stable  ♦  Forest of Time  ♦  Forest of Time Chasm  ♦  Forgotten Temple  ♦  Fort Hateno Cave  ♦  Fural Plain  ♦  Ga-ahisas Shrine  ♦  Gama Cove  ♦  Ganos Shrine  ♦  Gasas Shrine  ♦  Gatakis Shrine  ♦  Gatanisis Shrine  ♦  Gatepost Town Ruins  ♦  Gemimik Shrine  ♦  General Store (Goron City)  ♦  General Store (Hateno Village)  ♦  General Store (Kakariko Village)  ♦  General Store (Korok Forest)  ♦  General Store (Lookout Landing)  ♦  General Store (Lurelin Village)  ♦  General Store (Rito Village)  ♦  General Store (Tarrey Town)  ♦  General Store (Zora's Domain)  ♦  General Store 1 (Gerudo Town)  ♦  General Store 1 (Kara Kara Bazaar)  ♦  General Store 2 (Gerudo Town)  ♦  General Store 2 (Kara Kara Bazaar)  ♦  General Store 3 (Gerudo Town)  ♦  General Store 3 (Kara Kara Bazaar)  ♦  General Store 4 (Gerudo Town)  ♦  General Store 5 (Gerudo Town)  ♦  General Store East (Kakariko Village)  ♦  Gero Pond  ♦  Gerudo  ♦  Gerudo Canyon  ♦  Gerudo Canyon Mine  ♦  Gerudo Canyon Skyview Tower  ♦  Gerudo Canyon Stable  ♦  Gerudo Canyon Well  ♦  Gerudo Depths  ♦  Gerudo Desert  ♦  Gerudo Desert Gateway  ♦  Gerudo Great Skeleton  ♦  Gerudo Highlands  ♦  Gerudo Highlands Skyview Tower  ♦  Gerudo Sanctuary  ♦  Gerudo Sky  ♦  Gerudo Summit  ♦  Gerudo Town  ♦  Gerudo Underground Cemetery  ♦  Giant's Forest  ♦  Gikaku Shrine  ♦  Ginner Woods  ♦  Gisa Crater  ♦  Gisa Crater Cave  ♦  Gleeok Bridge  ♦  Gleeok Den  ♦  Goflam's Lavafalls  ♦  Gogobi Shores  ♦  Golow River  ♦  Goponga Island  ♦  Goponga Village Ruins  ♦  Gorko Lake  ♦  Gorko tunnel  ♦  Goro Cove  ♦  Gorobi River  ♦  Goron City  ♦  Goron Hot Springs  ♦  Goronbi River Cave  ♦  Goronobi Lake  ♦  Gortram Cliff  ♦  Granajh Canyon Mine  ♦  Great Abandoned Central Mine  ♦  Great Cliffs  ♦  Great Fairy Fountain (Hyrule Field)  ♦  Great Fairy Fountain (Military Training Camp)  ♦  Great Fairy Fountain (Tabantha Snowfield)  ♦  Great Hyrule Forest  ♦  Great Plateau  ♦  Great Plateau Foothill Cave  ♦  Great Plateau North Chasm  ♦  Great Sky Island  ♦  Great Zora Bridge  ♦  Grinnden Plains  ♦  Grove of Time  ♦  Guchini Plain  ♦  Gut Check Rock  ♦  Gutanbac Shrine  ♦  Hanu Pond  ♦  Haran Lake  ♦  Haran Lakefront Well  ♦  Harfin Valley  ♦  Harker Lake  ♦  Hateno Ancient Tech Lab  ♦  Hateno Bay  ♦  Hateno Beach  ♦  Hateno Pasture  ♦  Hateno School  ♦  Hateno Village  ♦  Hateno Village North well  ♦  Hebra  ♦  Hebra Canyon Mine  ♦  Hebra Dark Skeleton  ♦  Hebra Depths  ♦  Hebra East Summit  ♦  Hebra Falls  ♦  Hebra Great Skeleton  ♦  Hebra Headspring  ♦  Hebra Mountains  ♦  Hebra Mountains Northwest Cave  ♦  Hebra North Crest  ♦  Hebra North Summit  ♦  Hebra Peak  ♦  Hebra Plunge  ♦  Hebra Sky  ♦  Hebra South Summit  ♦  Hebra South Summit Cave  ♦  Hebra Summit Cave  ♦  Hebra Trailhead Lodge  ♦  Hebra West Summit  ♦  Herin Lake  ♦  Hickaly Woods  ♦  Highland Stable  ♦  Hills of Baumer Chasm  ♦  Hopper Pond  ♦  Horon Lagoon  ♦  Horon Lagoon Cave  ♦  Horse God Bridge  ♦  Hudson Construction Site  ♦  Hylia Island  ♦  Hylia River  ♦  Hyrule  ♦  Hyrule Castle  ♦  Hyrule Castle Chasm  ♦  Hyrule Castle Moat  ♦  Hyrule Castle Town Ruins  ♦  Hyrule Field  ♦  Hyrule Field Chasm  ♦  Hyrule Field Skyview Tower  ♦  Hyrule Garrison Ruins  ♦  Hyrule Ridge  ♦  Hyrule Ridge Chasm  ♦  Ibara Butte  ♦  Icefall Foothills  ♦  Icefall Foothills Cave  ♦  Igashuk Shrine  ♦  Igoshon Shrine  ♦  Ihen-a Shrine  ♦  Ijo-o Shrine  ♦  Ikatak Shrine  ♦  Illumeni Plateau  ♦  In-isa Shrine  ♦  Inn (Gerudo Town)  ♦  Inn (Goron City)  ♦  Inn (Hateno Village)  ♦  Inn (Kakariko Village)  ♦  Inn (Kara Kara Bazaar)  ♦  Inn (Korok Forest)  ♦  Inn (Lurelin Village)  ♦  Inn (Rito Village)  ♦  Inn (Tarrey Town)  ♦  Inn (Zora's Domain)  ♦  Irasak Shrine  ♦  Irch Plain  ♦  Ishodag Shrine  ♦  Ishokin Shrine  ♦  Isisim Shrine  ♦  Isle of Rabac  ♦  Isle of Rabac Gallery  ♦  Iun-orok Shrine  ♦  Ja'Abu Ridge  ♦  Jewelry Shop  ♦  Jia Highlands  ♦  Jikais Shrine  ♦  Jinodok Shrine  ♦  Jiosin Shrine  ♦  Jiotak Shrine  ♦  Jirutagumac Shrine  ♦  Jiukoum Shrin  ♦  Jiukoum Shrine  ♦  Jochi-ihiga Shrine  ♦  Jochi-iu Shrine  ♦  Jochisiu Shrine  ♦  Jogou Shrine  ♦  Jojon Shrine  ♦  Joju-u-u Shrine  ♦  Joku-u Shrine  ♦  Joku-usin Shrine  ♦  Joniu Shrine  ♦  Jonsau Shrine  ♦  Josiu Shrine  ♦  Kadaunar Shrine  ♦  Kaepora Pass  ♦  Kahatanaum Shrine  ♦  Kakariko Bridge  ♦  Kakariko Village  ♦  Kakariko Village Cave  ♦  Kamah Plateau  ♦  Kamatukis Shrine  ♦  Kamizun Shrine  ♦  Kanalet Ridge  ♦  Kara Kara Bazaar  ♦  Karahatag Shrine  ♦  Karusa Valley  ♦  Keelay Plain  ♦  Kikakin Shrine  ♦  Kimayat Shrine  ♦  Kincean Island  ♦  Kisinona Shrine  ♦  Kitano Bay  ♦  Kitawak Shrine  ♦  Kiuyoyou Shrine  ♦  Knuckel Island  ♦  Kolami Bridge  ♦  Kolomo Garrison Ruins  ♦  Komo Shoreline  ♦  Koopeeki Dridges  ♦  Kopeeki Drifts  ♦  Kopeeki Drifts Cave  ♦  Korne Beach  ♦  Korok Forest  ♦  Korok Grove  ♦  Koto Pond  ♦  Koukot Plateau  ♦  Koukot Plateau Cave  ♦  Kudanisar Shrine  ♦  Kumamayn Shrine  ♦  Kurakat Shrine  ♦  Kyokugon Shrine  ♦  Kyononis Shrine  ♦  Lake Akkala  ♦  Lake Darman  ♦  Lake Darman Monster Den  ♦  Lake Ferona  ♦  Lake Ferona Cave  ♦  Lake Floria  ♦  Lake Hylia  ♦  Lake Hylia Chasm  ♦  Lake Hylia Whirlpool Cave  ♦  Lake Illumeni  ♦  Lake Intenoch  ♦  Lake Intenoch Cave  ♦  Lake Kilsie Cave  ♦  Lake Kolomo  ♦  Lake Mekar  ♦  Lake of the Horse God  ♦  Lake Saria  ♦  Lake Siela  ♦  Lake Sumac  ♦  Lake Totori  ♦  Lakeside Stable  ♦  Lanayru  ♦  Lanayru Bay  ♦  Lanayru Bluff  ♦  Lanayru Depths  ♦  Lanayru Great Spring  ♦  Lanayru Great Spring Sky  ♦  Lanayru Range  ♦  Lanayru Road - West Gate  ♦  Lanayru Road East Cave  ♦  Lanayru Road South Cave  ♦  Lanayru Sky  ♦  Lanayru Sky Archipelago  ♦  Lanayru Wetlands  ♦  Lanayru Wetlands Chasm  ♦  Lantern Lake  ♦  Laparoh Mesa  ♦  Laverra Beach  ♦  Left-Arm Depot  ♦  Left-Leg Depot  ♦  Lightcast Island  ♦  Lightning Temple  ♦  Lightning Temple Entrance  ♦  Lindor's Brow  ♦  Lindor's Brow Cave  ♦  Lindor's Brow Skyview Tower  ♦  Lindor Canyon Mine  ♦  Lizard's Burrow  ♦  Lodrum Headland  ♦  Lomei Depths Labyrinth  ♦  Lomei Labyrinth  ♦  Lomei Labyrinth Chasm  ♦  Lomei Sky Labyrinth  ♦  Lone Island Coliseum  ♦  Lookout Landing  ♦  Lookout Landing Skyview Tower  ♦  Lookout Landing Well  ♦  Loshlo Harbor  ♦  Lost Woods  ♦  Lower Spectacle Rock Cave  ♦  Lucky Clover Gazette  ♦  Ludfo's Bog  ♦  Lulu Lake  ♦  Lurelin Village  ♦  Lurelin Village Well  ♦  Luto's Channel  ♦  Luto's Crossing  ♦  Mabe Prairie  ♦  Mable Ridge  ♦  Madorna Mountain  ♦  Mae Village Ruins  ♦  Makasura Shrine  ♦  Makurukis Shrine  ♦  Malanya Spring  ♦  Malin Bay  ♦  Manhala Bridge  ♦  Maoikes Shrine  ♦  Mapla Point Cave  ♦  Marakuguc Shrine  ♦  Marari-in Shrine  ♦  Marblod Plain  ♦  Martha's Landing  ♦  Maw of Death Mountain  ♦  Mayachideg Shrine  ♦  Mayachin Shrine  ♦  Mayahisik Shrine  ♦  Mayak Shrine  ♦  Mayam Shrine  ♦  Mayamats Shrine  ♦  Mayanas Shrine  ♦  Mayaotaki Shrine  ♦  Mayasiar Shrine  ♦  Mayatat Shrine  ♦  Mayaumekis Shrine  ♦  Mayausiy Shrine  ♦  Meadela's Mantle  ♦  Meadela's Mantle Cave  ♦  Meda Canyon Mine  ♦  Meda Lavafalls  ♦  Meda Mountain  ♦  Meda Mountain Chasm  ♦  Mekar Island  ♦  Menoat River  ♦  Mercay Island  ♦  Mido Swamp  ♦  Mikau Lake  ♦  Military Training Camp  ♦  Millennio Sandbar  ♦  Minetak Shrine  ♦  Mini Stable  ♦  Mining Cave  ♦  Minshi Grove  ♦  Minshi Woods  ♦  Minshi Woods Chasm  ♦  Mipha Court  ♦  Miryotanog Shrine  ♦  Mogawak Shrine  ♦  Mogisari Shrine  ♦  Momosik Shrine  ♦  Moor Garrison Ruins  ♦  Morok Shrine  ♦  Moshapin Shrine  ♦  Motsusis Shrine  ♦  Mount Agaat  ♦  Mount Daphnes  ♦  Mount Drena  ♦  Mount Drena Foothill Cave  ♦  Mount Dunsel  ♦  Mount Dunsel Cave  ♦  Mount Faloraa  ♦  Mount Floria  ♦  Mount Floria Cave  ♦  Mount Granajh  ♦  Mount Gustaf  ♦  Mount Hylia  ♦  Mount Lanayru  ♦  Mount Lanayru Skyview Tower  ♦  Mount Nabooru Cave  ♦  Mount Nabooru South Cave  ♦  Mount Rhoam  ♦  Mount Taran  ♦  Musanokir Shrine  ♦  Mystathi's Shelf  ♦  Mystathi's Shelf Cave  ♦  Nabi Lake  ♦  Nachoyah Shrine  ♦  Natak Shrine  ♦  Nautelle Wetlands  ♦  Naydra Snowfield  ♦  Necluda  ♦  Necluda Depths  ♦  Necluda Sky  ♦  Necluda Sky Archipelago  ♦  Nephra Hill  ♦  Nero Hill  ♦  Nette Plateau  ♦  New Serenne Stable  ♦  Nima Plain  ♦  Ninjis Shrine  ♦  Nirvata Plateau  ♦  North Akkala Beach  ♦  North Akkala Beach Cave  ♦  North Akkala Foothill  ♦  North Akkala Sky Archipelago  ♦  North Akkala Valley  ♦  North Biron Snowshelf Cave  ♦  North Gerudo Ruins  ♦  North Gerudo Sky Archipelago  ♦  North Hyrule Plain  ♦  North Hyrule Plain Cave  ♦  North Hyrule Sky Archipelago  ♦  North Lomai Labyrinth  ♦  North Lomei Chasm  ♦  North Lomei Depths Labyrinth  ♦  North Necluda Sky Archipelago  ♦  North Tabantha Sky Archipelago  ♦  North Tabantha Snowfield  ♦  Northern Icehouse  ♦  Nouda Shrine  ♦  O-ogim Shrine  ♦  Oakle's Navel Cave  ♦  Oasis Source  ♦  Ordorac Quarry  ♦  Oren Bridge  ♦  Oren Bridge Cave  ♦  Orochium Shrine  ♦  Oromuwak Shrine  ♦  Oseria Plains  ♦  Oshozan-u Shrine  ♦  Otak Shrine  ♦  Otutsum Shrine  ♦  Outpost Ruins  ♦  Outskirt Stable  ♦  Ovli Plain  ♦  Pagos Woods  ♦  Pagos Woods Excavation Site  ♦  Palmorae Beach  ♦  Palu Wasteland  ♦  Passer Hill  ♦  Passeri Greenbelt  ♦  Passeri Greenbelt Cave  ♦  Peak of Awakening  ♦  Phallian Highlands  ♦  Pico Pond  ♦  Pico Pond Cave  ♦  Pierre Plateau  ♦  Pikida Stonegrove  ♦  Pikida Stonegrove Northwest Cave  ♦  Pikida Stonegrove Skyview Tower  ♦  Pillars of Levia  ♦  Piper Ridge  ♦  Pit Cave  ♦  Ploymus Canyon Mine  ♦  Ploymus Mountain  ♦  Ploymus Mountain Cave  ♦  Pondside Cave  ♦  Popla Foothills  ♦  Popla Foothills Excavation Site  ♦  Popla Foothills Skyview Tower  ♦  Pristine Sanctum  ♦  Puffer Beach  ♦  Puffer Beach Overhead Cave  ♦  Pupunke Shrine  ♦  Purifier Lake  ♦  Quarry Ruins  ♦  Quatta's Shelf  ♦  Quicksand Lake Cave  ♦  Rabella Wetlands  ♦  Rabella Wetlands Skyview Tower  ♦  Rabia Plain  ♦  Rakakudaj Shrine  ♦  Rakashog Shrine  ♦  Ralis Channel  ♦  Ralis Pond  ♦  Ranch Ruins  ♦  Ranch Ruins Cave  ♦  Rasitakiwak Shrine  ♦  Rasiwak Shrine  ♦  Rassla Lake Cave  ♦  Rauru Hillside  ♦  Rauru Hillside Cave  ♦  Rayne Mountains  ♦  Rebonae Bridge Cave  ♦  Ren-iz Shrine  ♦  Reservoir Lakefront Cavern  ♦  Retsam Forest  ♦  Retsam Forest Cave  ♦  Right-Arm Depot  ♦  Right-Leg Depot  ♦  Rikoka Hills  ♦  Rimba Beach  ♦  Ring Ruins  ♦  Riogok Shrine  ♦  Rising Island Chain  ♦  Risoka Snowfield  ♦  Rist Mine  ♦  Rist Peninsula  ♦  Rito Village  ♦  Rito Village Chasm  ♦  River of the Dead  ♦  River of the Dead Waterfall Cave  ♦  Riverside Stable  ♦  Robred Dropoff Cave  ♦  Rodai Lake  ♦  Rodai Lakefront Tunnel  ♦  Rok Woods  ♦  Romani Plains  ♦  Room of Awakening  ♦  Rospro Pass  ♦  Rospro Pass Cave  ♦  Rospro Pass Skyview Tower  ♦  Rotsumamu Shrine  ♦  Rowan Plain  ♦  Runakit Shrine  ♦  Rutafu-um Shrine  ♦  Rutile Lake  ♦  Rutimala Hill  ♦  Ruto Canyon Mine  ♦  Ruto Lake  ♦  Ruto Precipice  ♦  Sacred Ground Ruins  ♦  Safula Hill  ♦  Sage Temple Cave  ♦  Sahasra Slope  ♦  Sahasra Slope Cave  ♦  Sahasra Slope Skyview Tower  ♦  Sahirow Shrine  ♦  Sakunbomar Shrine  ♦  Salari Hill  ♦  Salari Plain  ♦  Samasa Plain  ♦  Sanctum  ♦  Sand-Seal Rental Shop (Gerudo Desert Gateway)  ♦  Sand-Seal Rental Shop (Gerudo Town)  ♦  Sanidin Park Ruins  ♦  Sapphia's Table  ♦  Sarjon Woods  ♦  Sarjon Woods Cave  ♦  Satori Mountain  ♦  Satori Mountain Cave  ♦  Satori Mountain Foothill Cave  ♦  Scorching Coliseum  ♦  Scout's Hill  ♦  Secluded Coliseum  ♦  Secret Spring of Revival  ♦  Sepapa Shrine  ♦  Seres Scablands  ♦  Serutabomac Shrine  ♦  Serutoabomac Shrine  ♦  Shadow Pass  ♦  Shatterback Point  ♦  Sherfin's Lavafalls  ♦  Shrine of Resurrection  ♦  Sibajitak Shrine  ♦  Sifumim Shrine  ♦  Sihajog Shrine  ♦  Sikukuu Shrine  ♦  Simosiwak Shrine  ♦  Sinakawak Shrine  ♦  Sinatanika Shrine  ♦  Sisuran Shrine  ♦  Sitsum Shrine  ♦  Siwakama Shrine  ♦  Siyamotsus Shrine  ♦  Skull Lake  ♦  Skull Lake Cave  ♦  Sky Mine  ♦  Slippery Falcon  ♦  Snowfield Stable  ♦  Soka Point  ♦  Sokkala Sky Archipelago  ♦  Sonapan Shrine  ♦  Soryotanog Shrine  ♦  South Akkala Plains  ♦  South Akkala Plains Chasm  ♦  South Akkala Stable  ♦  South Eldin Sky Archipelago  ♦  South Gerudo Cave  ♦  South Hebra Sky Archipelago  ♦  South Hyrule Sky Archipelago  ♦  South Lake Akkala  ♦  South Lanayru Sky Archipelago  ♦  South Lomei Chasm  ♦  South Lomei Depths Labyrinth  ♦  South Lomei Labyrinth  ♦  South Nabi Lake  ♦  South Tabantha Snowfield  ♦  Southern Mine  ♦  Southern Oasis  ♦  Spectacle Rock  ♦  Spectacle Rock Cave  ♦  Spirit Temple  ♦  Spool Bight  ♦  Spring of Courage  ♦  Spring of Power  ♦  Spring of Wisdom  ♦  Squabble River  ♦  Stalry Plateau  ♦  Stalry Plateau Cave  ♦  Starview Island  ♦  Stinger Cliffs  ♦  Strock Lake  ♦  Sturnida Springs Cave  ♦  Suariwak Shrine  ♦  Susub Shrine  ♦  Susuyai Shrine  ♦  Swallows Roost Inn  ♦  Taafei Hill  ♦  Taafei Hill Cave  ♦  Tabahl Woods Cave  ♦  Tabantha Bridge Stable  ♦  Tabantha Frontier  ♦  Tabantha Great Bridge  ♦  Tabantha Hills  ♦  Tabantha Hills Cave  ♦  Tabantha Sky Archipelago  ♦  Tabantha Tundra  ♦  Tabantha Village Ruins  ♦  Tadarok Shrine  ♦  Tajikats Shrine  ♦  Taki-ihaban Shrine  ♦  Tal Tal Peak  ♦  Talonto Peak  ♦  Talonto Peak Cave  ♦  Talus Plateau  ♦  Tama Pond  ♦  Tamio River Downstream Cave  ♦  Tanagar Canyon  ♦  Tanagar Canyon East Cave  ♦  Tanagar Canyon West Cave  ♦  Taninoud Shrine  ♦  Taobab Grassland  ♦  Taran Pass  ♦  Tarm Point  ♦  Tarm Point Cave  ♦  Tarrey Town  ♦  Tarrey Town Tunnel  ♦  Taunhiy Shrine  ♦  Tauyosipun Shrine  ♦  Telta Lake  ♦  Tempest Gulch  ♦  Temto Hill  ♦  Tenbez Shrine  ♦  Teniten Shrine  ♦  Tenmaten Shrine  ♦  Tenoko Island  ♦  Ternio Trail  ♦  Thunderhead Isles  ♦  Thundra Plateau  ♦  Thundra Plateau Cave  ♦  Thyphlo Ruins  ♦  Thyphlo Ruins Skyview Tower  ♦  Timawak Shrine  ♦  Tingel Island  ♦  Tobio's Hollow  ♦  Tobio's Hollow Cave  ♦  Tobio's Hollow Chasm  ♦  Tokiy Shrine  ♦  Torin Weland  ♦  Toruma Dunes  ♦  Toto Lake  ♦  Trilby Plain  ♦  Trilby Valley  ♦  Trotter's Downflall  ♦  Tsutsu-um Shrine  ♦  Tuft Mountain  ♦  Tukarok Shrine  ♦  Tumlea Heights  ♦  Turakamik Shrine  ♦  Turakawak Shrine  ♦  Ubota Point Cave  ♦  Ukoojisi Shrine  ♦  Ukouh Shrine  ♦  Ukuku Plains  ♦  Ulri Mountain  ♦  Ulri Mountain Skyview Tower  ♦  Ulria Grotto  ♦  Ulria Grotto East Cave  ♦  Ulria Grotto South Cave  ♦  Upland Lindor  ♦  Upland Zorana  ♦  Upland Zorana Byroad  ♦  Upland Zorana Foothill Cave  ♦  Upland Zorana Mountainside Cave  ♦  Upland Zorana Skyview Tower  ♦  Upland Zorana Summit Cave  ♦  Usazum Shrine  ♦  Uten Marsh  ♦  Utojis Shrine  ♦  Utsushok Shrine  ♦  Valley of Silent Statues  ♦  Valor Island  ♦  Vatorsa Snowfield  ♦  Veiled Falls  ♦  Walnot Mountain  ♦  Walnot Mountain Cave  ♦  Wao-os Shrine  ♦  Washa's Bluff  ♦  Water Reservoir  ♦  Water Temple  ♦  Wellspring Island  ♦  Wellspring of Courage  ♦  Wellspring of Wisdom  ♦  Wes Island  ♦  West Barrens  ♦  West Deplian Badlands  ♦  West Gerudo Ruins  ♦  West Gerudo Underground Ruins  ♦  West Hebra Sky Archipelago  ♦  West Hyrule Plains  ♦  West Lake Totori Cave  ♦  West Necluda  ♦  West Necluda Sky Archipelago  ♦  West Restaurant Cave  ♦  Wetland Stable  ♦  Whistling Hill  ♦  Whistling Hill Cave  ♦  Wind Temple  ♦  Windvane Meadow  ♦  Wintre Island  ♦  Woodland Stable  ♦  Yambi Lake  ♦  Yamiyo Shrine  ♦  Yansamin Shrine  ♦  Yarna Valley  ♦  Yiga Blademaster Station  ♦  Yiga Clan Hideout  ♦  Yiga Clan Maritta Branch  ♦  Yomizuk Shrine  ♦  YunoboCo HQ  ♦  YunoboCo HQ East Cave  ♦  YunoboCo HQ South Cave  ♦  Zakusu Shrine  ♦  Zanmik Shrine  ♦  Zauz Island  ♦  Zelkoa Pond  ♦  Zelo Pond  ♦  Zirco Mesa  ♦  Zodobon Highlands  ♦  Zokassa Ridge  ♦  Zonai Ruins  ♦  Zonai Survey Team Base  ♦  Zonaite Forge Island  ♦  Zora's Domain  ♦  Zora River


Tired of anon posting? Register!
    • Anonymous

      If you explore all side passages you get all 3 items in the Soldiers Armor set. They each have a defence of 4.

      • Anonymous

        Across from the rock pile that hides the Stalinox is a pile of rocks through the water (there's torches in the water indicating it). Destroying that and the like like inside will allow access to the chest containing the soldiers helm.

        • Anonymous

          This actually keeps going until you’re inside of hyrule castle (well what’s left of it on the ground).

          There’s a section where you can go up a branch to find another path - then you’ll hit what looks like a dead end but if you look above you can bomb arrow through to keep going.

          • Anonymous

            After fighting the black horriblibs, continue above and destroy the blue rocks ahead. After that there will be a castle door blocked by rocks. Break those to reveal another prison cell with a gate that wont move. In 1 cell remove the large boulder and drop down. Go to the end and ascend up. Now behind the gate, slay the last skeleton. Soldiers armor is in a chest there.

          Load more
          ⇈ ⇈