Tajikats Shrine is a Shrine in Zelda Tears of the Kingdom. Tajikats Shrine is the Shrine that features the Building with Logs Challenge. As the subtitle suggests, this shrine encourages players to use Logs as a tool to find their way across or over different obstacles by predominantly using the Ultahand ability. Shrines are mini-dungeons, housing quick trials such as puzzles or short enemy encounters. Once a Shrine has been completed, the player obtains a Light of Blessing, an item key to obtaining more Heart Containers and Stamina Vessels, and the Shrine is unlocked as a Fast Travel point. If the Shrine has not been completed but has been activated, it will be marked in yellow on the map. It will still be available for fast travel so that can players return and complete the Shrine at a later time.
[header image goes here]
General Info
- Bosses: n/a
- Region: Central Hyrule
- Nearest Location: Riverside Stable, Whistling Hill
- [TotK Map Link]
Video Walkthrough
[video goes here]
Unique Items
- n/a
NPCs
- n/a
Bosses
- n/a
Items
Food
- n/a
Equipment & Materials
- Spiky Shield
Key Items
- n/a
Enemies
- n/a
Tajikats Shrine Walkthrough Guide
Reaching Tajikats Shrine
This Shrine can be found just next to the Riverside Stable. It is located southeast of the Hyrule Field just east of Lake Kolomo past the Teniten Shrine.
How to Complete Tajikats Shrine
As the subtitle suggests, players will be building with logs. For the first section, you will have one log available to get you to the next section. You can prop this log up again the wall with Ultrahand. Use any of the corners to balance the log and as long as it stays up, Link should be able to climb it to get to the next section.
Puzzle 2
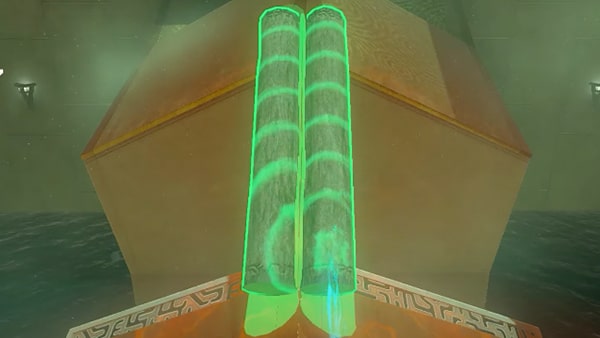
This time you will have two logs to work with. Use Ultrahand to stick them together side by side. Bring the newly fused logs toward the next gap. Since both ledges have a corner, you can balance the center of the two logs, where the two logs create a wedge, at the corner of the ledges like the image below. This should create a secure bridge across.

Puzzle 3
Once you made it across, this time you will have another set of 2 logs. This time instead of sticking them side by side, fuse them end to end to create a longer bridge. You can now put this over the gap to create a bridge. For a secure spot, you can use the lights on either side across the gap and place the logs on the side so that they do not roll too much. Use the bridge to then make your way across.
Puzzle 4
The next section can be done similarly. This time the Shrine provides you with 6 logs. The gap will be 3 logs wide. Create 2 sets of 3 log bridges by sticking 3 logs end to end. Once you have 2 sets of these, you can then fuse the two sets together side by side for stability. This will provide you with a new ramp and bridge to get across the gap to the next higher platform.
Puzzle 5 & Chest
Finally, you will have another set of logs available to you so that you can cross the body of water along with two fans. You will only next to stick 3 logs together side by side to create a stable raft. Players can even potentially only use 2 logs. Create your raft, then attack two fans behind it. Place the raft in the water. Direct it towards the left side of the shrine since this is where you will find the shrine's chest. Activate the fans by striking them. Once you are close enough, strike them again to switch the fans off. Open the chest for a fused Spiky Shield.
Use Ultrahand again on your raft and direct it toward the end of the Shrine. If the angle is slightly off, jump off at the closest point to the last platform and you should still be able to swim across to end and exit the shrine.
Video
[video goes here]
Tajikats Shrine Trivia & Notes:
Trivia and notes go here
