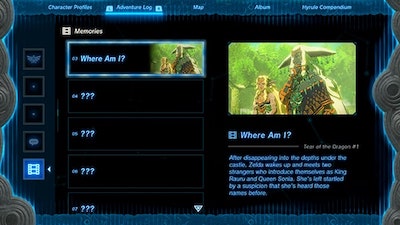
Dragon Tears in Zelda: Tears of the Kingdom are the Memories that can be collected as part of The Dragon's Tears Main Quest. These tears are first introduced during the Impa and the Geoglyphs Main Quest and make up 12 out of the 18 total memories that can be collected through completing the Main Quests, and there are 11 Geoglyphs that can be encountered on the map. Locate the Geoglyphs around the map and get a higher view to locate a pool that will contain a Dragon Tear. Examine the pool to access a vision of Princess Zelda. These clips are then collected as Memories and can be replayed at any time from the Adventure Log. To access your memories, Select the Adventure Log from the Menu. Memories will then be the last tab found after your Main Quests, Side Adventures, Shrine Quests, and Side Quests.
What are Dragon Tears?
Dragon Tears unlock Memories. Impa believes that the Dragon's Tears are connected to the princess in some way. Go in search of every geoglyph to find more clues about what's happened to her. - Impa and the Geoglyphs
What are Memories in Tears of the Kingdom?
Memories in Zelda: Tears of the Kingdom have a similar mechanic as Memories in Breath of the Wild. Memories are collected and grant players a clip of Zelda that once took place. To collect Dragon Tear memories in Tears of the Kingdom, players must locate a pool located within a Geoglyph. This will be easier to locate when Link has an aerial view of an encountered Geoglyph. Interact with the pool to gain a Dragon Tear which will unlock a Memory. There are 18 Memories in total. Other Memories are unlocked by going through and completing Main Quests.
All Dragon Tears in Tears of the Kingdom
Viewing Geoglyphs in Hyrule
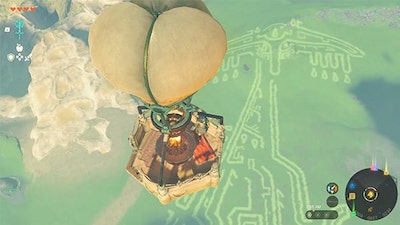
Geoglyphs are large patterns on wide fields and plains. the overall view of the Glyph is best viewed from a bird's eye view. Players can achieve this view by gliding down from the skies, taking a Balloon up, or using a nearby Skyview Tower to gain a better perspective of the Geoglyph. This will also help you locate the pool on the glyph so that once you are grounded, it can be investigated to gain the Dragon's Tear. Players may even find a suspiciously placed rock on a tear pattern located on the glyph. Once on the ground, lift the rock and a Korok may greet you.
Geoglyph Locations in Hyrule
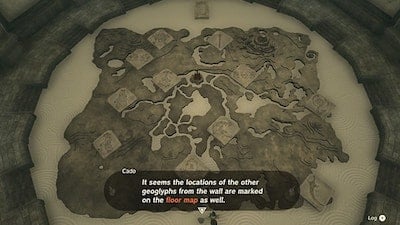
Once players progress through The Dragon's Tears, it will lead players to a mural in the Forgotten Temple. Inside the Forgotten Temple is a map of Hyrule and 11 murals related to the geoglyphs. It seems that these geoglyphs appeared in various places after the Upheaval when Princess Zelda went missing. Players can refer to the Mural for the locations of the Geoglyphs on the map.
All Tears of the Dragon Locations Zelda: Tears of the Kingdom
Tear of the Dragon #1 - Where Am I?
- Location: North Hyrule Plain: Across New Serenne Stable
- View Location on the Map: [Map Link]
- Memory: #3
- Description: After disappearing into the depths under the castle, Zelda wakes up and meets two strangers who introduce themselves as King Rauru and Queen Sonia. She’s left startled by a suspicion that she’s heard those names before.
Tear of the Dragon #2 - An Unfamiliar World
- Location: Tabantha Hills, Hebra
- View Location on the Map: [Map Link]
- Memory: #4
- Description: Looking out across the world she’s found herself in, Zelda realizes she’s traveled to the ancient past and questions how she can get back to her own time. Sonia offers some helpful thoughts, but it’s Rauru who realizes his older sister, Mineru, might know a way Zelda can travel forward in time.
Tear of the Dragon #3 - Mineru’s Counsel
- Location: Eldin Canyon, Eldin
- View Location on the Map: [Map Link]
- Memory: #5
- Description: After examining the Purah Pad, Mineru accepts that Zelda is from a different time and explains the only way she might get to the future is by using draconification. It’s a forbidden act, however, because Zelda would need to sacrifice her sense of self. Rauru tells a disappointed Zelda to speak with Sonia and learn more about her power over time itself.
Tear of the Dragon #4 - The Gerudo Assault
- Location: Southeast Hyrule Field, Central Hyrule
- View Location on the Map: [Map Link]
- Memory: #6
- Description: The Gerudo chief, Ganondorf, in his push to conquer Hyrule, uses a swarm of Molduga to assault the castle. When Rauru uses his powers to unleash an attack that destroys the swarm, Ganondorf notices the Zonai secret stone on Rauru’s right hand. The sight of it draws a sinister smile from Ganondorf.
Tear of the Dragon #5 - A Show of Fealty
- Location: Sapphia's Table, Gerudo Highlands
- View Location on the Map: [Map Link]
- Memory: #7
- Description: Invited before the court of Hyrule, Ganondorf kneels before King Rauru and pledges his fealty– while concealing a smile that says otherwise. Still, Zelda is uneasy, and tells Rauru that she’s certain the chief has treachery on his mind. Rauru assures her that he’s been fully aware of it.
Tear of the Dragon #6 - Zelda and Sonia
- Location: Illumeni Plateau, Hyrule Ridge
- View Location on the Map: [Map Link]
- Memory: #8
- Description: When Zelda speaks with Sonia to learn how to use her own time powers, she’s surprised by the queen’s techniques. Sonia then speaks with Zelda about everything she must be struggling with, and the princess then mentions Link. Rauru has never heard of him before, and as Zelda explains who he is, her faith in her friend and hero shines.
Tear of the Dragon #7 - Sonia is Caught by Treachery
- Location: Gogobi Shores, Faron
- View Location on the Map: [Map Link]
- Memory: #9
- Description: Sonia meets with Zelda in private, and when the princess is revealed to be a creature under Ganondorf’s command, Sonia and the real Zelda address the threat with confidence. The false Zelda laughs eerily and vanishes in a mist of gloom. In that moment, Ganondorf steps up behind Sonia and catches the queen by surprise. She falls victim to the scheme.
Tear of the Dragon #8 - Birth of the Demon King
- Location: North Tabantha Snowfield, Hebra
- View Location on the Map: [Map Link]
- Memory: #10
- Description: With the secret stone he took from Sonia, Ganondorf turns into the Demon King. The gloom that issues from his body creates countless monsters that howl across the world. Rauru goes to Sonia’s side to help his fallen queen. Though furious at Ganondorf, he knows the Demon King is too powerful to confront at that moment. He retreats with Zelda.
Tear of the Dragon #9 - The Sages’ Vow
- Location: Talus Plateau, East Lanayru
- View Location on the Map: [Map Link]
- Memory: #12
- Description: Backed into a corner by the attacks in all parts of Hyrule, leaders facing the Demon King’s forces gather at Rauru’s call. He gives each a Zonai secret stone, making them sages with powers amplified by the stones. All of the sages raise their voices as one, pledging to fight with King Rauru to the end.
Tear of the Dragon #10 - A King’s Duty
- Location: West of Hylia Lake, Faron Grasslands
- View Location on the Map: [Map Link]
- Memory: #13
- Description: On the eve of battle, Zelda tells Rauru that in her future, she’s been that the Demon King is alive, and that it means they won’t defeat him the next day. Rauru says that he will still do what he must, even at the cost of his life. If they fail, their last line of defense will be the knight in the future, who wields the sword that seals the darkness.
Tear of the Dragon #11 - A Master Sword in Time
- Location: Northwest of the Great Hyrule Forest, Eldin
- View Location on the Map: [Map Link]
- Memory: #15
- Description: As Zelda worries about the Demon King breaking free in the future, a decayed Master Sword appears before her, delivering the news to Zelda that Link is safe in her time. This helps Zelda realize the reason behind her traveling to the ancient days of Hyrule–she finally knows what she must do.
Tear of the Dragon #12 - Tears of the Dragon
- Location: Rist Peninsula, East Akkala (Not identified with a Mural)
- View Location on the Map: [Map Link]
- Memory: #17
- Description: After leaving the Purah Pad in Mineru’s care, Zelda swallows the secret stone, holding a hope for Link’s future in her heart. As bright light washes over her. Zelda transforms into the Light Dragon, roaring as she ascends into the sky. Tears fall from her eyes and rain from the heavens as the Light Dragon vanishes into an expanse of clouds.


